Deploying a Next.js Portfolio on AWS: From Static Website to Production-Style Infrastructure

How I chose the architecture and the assumptions I had to revise along the way
Introduction
When learning cloud engineering, it’s easy to become focused on individual services and tools. You learn how Amazon S3 stores objects, how CloudFront improves performance, or how Terraform provisions infrastructure.
In practice, however, cloud engineering isn’t about knowing services in isolation. It’s about understanding how those services work together to satisfy business requirements while balancing security, performance, scalability, cost, and maintainability.
This project began with a simple design brief: deploy a static Next.js portfolio website on AWS in a way that was highly available, globally accessible, secure, scalable, and cost-effective.
At first glance, the solution appeared straightforward.
I. Upload the website to Amazon S3.
II. Place Amazon CloudFront in front of it.
III. Provision everything using Terraform.
Simple.
Or so I thought!
As implementation progressed, several architectural questions emerged that fundamentally shaped the final solution.
- Should the S3 bucket be public or private?
- If CloudFront serves the website, is Amazon S3 still performing static website hosting?
- How can Terraform use a remote backend before the backend itself exists?
- What does “production-ready” actually mean for a relatively simple application?
Answering those questions transformed what initially seemed like a straightforward deployment into one of the most valuable learning experiences of the project.
The rest of this article follows the order I actually worked in: understanding the workload, turning the requirements into an architecture, building it with Terraform, and the two places where my first assumptions turned out to be wrong.
1. Understand the Workload
One of the first lessons I learned from this project was that choosing AWS services shouldn’t be the starting point. Before designing any infrastructure, I first needed to understand the application itself.
Although the website was built with Next.js, not every Next.js application has the same hosting requirements. Next.js supports multiple rendering strategies — including Server-Side Rendering (SSR), Static Site Generation (SSG), and API Routes — and each one has different infrastructure implications.
If the application relied on server-side rendering or API routes, I would have needed compute resources such as AWS Lambda, containers, or Amazon EC2 to generate content dynamically. However, if every page could be generated during the build process, the application could be treated as a collection of static assets, significantly simplifying the architecture.
Rather than making assumptions based on the framework alone, I reviewed how the application was built.
After examining the project, I confirmed that it didn’t rely on Server-Side Rendering or API Routes. Instead, the entire website could be exported as static files by adding the following configuration to next.config.js:
/** @type {import('next').NextConfig} */
const nextConfig = {
  output: 'export',
}

module.exports = nextConfig
Running:
npm run buildgenerated an out/ directory containing everything required to serve the website — including HTML, CSS, JavaScript, images, and other static assets.
That small discovery had a significant impact on the architecture.
Because the content was generated during the build process rather than when users visited the site, there was no longer any need to run a Node.js server or provision compute resources to render pages dynamically. The workload had effectively become a static website.
This reinforced an important engineering principle that I’ll carry into future projects:
The application should determine the architecture — not the other way around.
Only after understanding the workload could I confidently begin selecting AWS services.

out/ directory contains the static assets generated during the build process2. Translate Business Requirements into Architecture
With the workload understood, the next step was selecting an architecture that satisfied the project’s business requirements rather than simply choosing AWS services because they were familiar.
The requirements were straightforward:
- High availability
- Global accessibility
- Low latency
- Security
- Cost-effectiveness
Each requirement influenced a specific architectural decision.
High Availability and Global Accessibility
Because the website could be accessed from anywhere in the world, serving requests from a single web server would introduce unnecessary latency and create a single point of failure.
Since the application consisted entirely of static assets, Amazon S3 provided a highly durable storage layer without the operational overhead of managing servers.
However, durability alone doesn’t guarantee performance. Users in different geographic regions would need to retrieve content from the AWS Region hosting the S3 bucket, increasing latency for visitors located far from the origin.
To address this, I placed Amazon CloudFront in front of the S3 bucket, hence improving performance. CloudFront caches frequently requested objects at edge locations around the world, allowing users to retrieve content from the location closest to them instead of always communicating directly with the origin.
A request from Sydney is served from an edge location in Sydney rather than crossing the Pacific to ca-central-1.

Cost-Effectiveness
One of the biggest advantages of understanding the workload early was realizing what infrastructure wasn’t needed.
Because every page was generated during the build process, we did not need to render content dynamically.
Get Samiashafique’s stories in your inbox
Join Medium for free to get updates from this writer.
Hosting the exported website in Amazon S3 became the logical choice as it eliminated the operational overhead of managing servers while keeping infrastructure costs extremely low.
Security
Security was the requirement that challenged my initial assumptions the most. When I first started planning the architecture, I assumed I would enable Amazon S3 Static Website Hosting and place CloudFront in front of it — a common approach for hosting static websites.
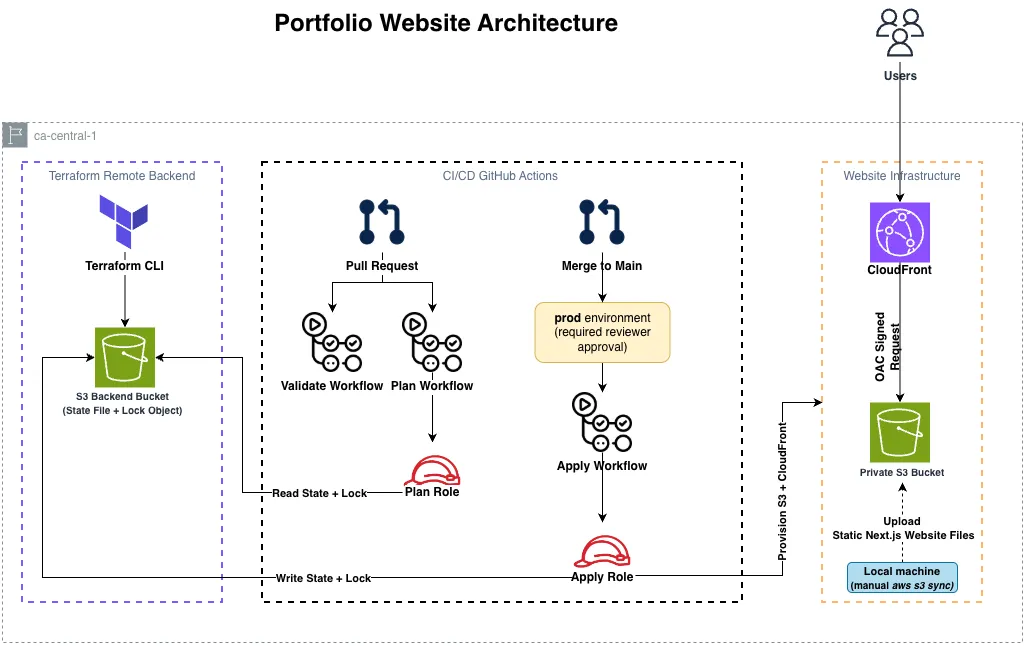
As I researched AWS best practices, I realized there was a more secure approach. Rather than exposing the S3 bucket to the internet, I could keep it private and allow CloudFront to access it using Origin Access Control (OAC). This design reduces the attack surface by making CloudFront the only public entry point to the application.
Since OAC works with the Amazon S3 REST endpoint rather than the Static Website endpoint, I no longer needed to enable S3 Static Website Hosting at all.
Instead, the bucket remained private throughout the project while CloudFront became the only service authorized to retrieve objects from it.
That realization fundamentally changed how I thought about the architecture. Initially, I viewed Amazon S3 as the website host. By the end of the project, I understood that CloudFront had become the public-facing layer, while Amazon S3 served as a secure private origin.

3. Build the Infrastructure
With the architecture finalized, the next step was translating those design decisions into Infrastructure as Code using Terraform.
Rather than provisioning resources manually through the AWS Management Console, I defined every component in code.That means the configuration lives in git, so I can see what changed and when, and I can rebuild the same infrastructure from the same files.
Before provisioning any AWS resources, I set up the project in a local Git repository and developed the infrastructure using Visual Studio Code. As the project progressed, I committed logical units of work and regularly pushed changes to GitHub, allowing the repository to evolve alongside the implementation.
As I worked through the project, I made a conscious decision to keep the Terraform configuration simple.
It’s easy to over-engineer Infrastructure as Code by introducing unnecessary modules, variables, or abstractions before they’re actually needed. Since this project provisions a single workload, I chose a straightforward structure where each file has a single, well-defined responsibility.
- providers.tf configures the AWS provider and specifies the required provider version.
- backend.tf configures the remote backend used to store Terraform state.
- main.tf defines the infrastructure resources, including the Amazon S3 bucket, CloudFront distribution, Origin Access Control (OAC), bucket policy, ownership controls, public access block, and server-side encryption.
- outputs.tf exposes useful deployment information, such as the CloudFront distribution domain name.
Keeping the configuration organized this way made it easier to understand how each part of the deployment fit together while avoiding unnecessary complexity.
Implementing a Remote Backend
One of the production practices I wanted to incorporate into this project was remote state management.
By default, Terraform stores its state locally. While this works well for personal experiments, production environments typically require a centralized state that can be shared across team members and CI/CD pipelines.
To achieve this, I configured Terraform to store its state in an Amazon S3 bucket while using Amazon DynamoDB for state locking. This helps prevent concurrent Terraform operations from modifying the same infrastructure simultaneously and provides a single source of truth for the deployment.
That decision introduced one of the most interesting challenges of the project. Terraform can’t store its state in a backend that doesn’t exist yet.
In other words, before Terraform could use the remote backend, the backend itself first had to be created.
Rather than attempting to solve this circular dependency within Terraform, I bootstrapped the backend resources using the AWS CLI. Once the Amazon S3 bucket and DynamoDB table existed, I configured backend.tf, migrated the state to the remote backend, and continued managing the rest of the infrastructure through Terraform.
The workaround itself was simple. The constraint behind it is the interesting part, and it comes back later in this series when CI needs an IAM role before CI can run.

Repository Hygiene
Infrastructure as Code extends beyond writing Terraform — it also includes maintaining a clean and well-organized repository.
One practice I followed throughout the project was excluding generated files and machine-specific artifacts from version control using .gitignore.
For example, the Next.js out/ directory wasn’t committed to the remote repository because it’s generated automatically every time npm run build is executed. Including build artifacts would unnecessarily increase the repository size while making version control noisier without providing any real benefit.
Similarly, Terraform-generated directories such as .terraform/, local state files, editor configuration files, and other temporary artifacts were excluded because they can be recreated whenever another developer clones the repository and initializes the project.
Keeping only the source code and infrastructure definitions under version control makes the repository easier to understand, reduces unnecessary merge conflicts, and allows anyone cloning the project to generate the required artifacts locally.

.gitignore, excluding generated files and local development artifacts from version control.Deploy the Infrastructure
With the infrastructure defined and the remote backend configured, provisioning the environment followed Terraform’s standard workflow.
terraform init
terraform plan
terraform apply- terraform init initialized the working directory, downloaded the required provider plugins, and configured Terraform to use the remote backend.
- terraform plan generated an execution plan, allowing me to review the proposed infrastructure changes before applying them.
- terraform apply provisioned the AWS resources and recorded their state in the remote backend.
Once the infrastructure had been successfully deployed, the final step was publishing the application itself.
Because the website had already been exported into static assets, deployment simply involved synchronizing the contents of the generated out/ directory to the private Amazon S3 bucket.
aws s3 sync ../portfolio-website/out s3://your-website-bucket-nameCloudFront then served the website globally, retrieving objects securely from the private S3 bucket and caching them at edge locations closer to users around the world.
With the deployment complete, the website was accessible through the CloudFront distribution domain.

4. Production Considerations
While this project focused on building a secure, production-style foundation for hosting a static website on AWS, there are several enhancements I would consider for a real-world deployment.
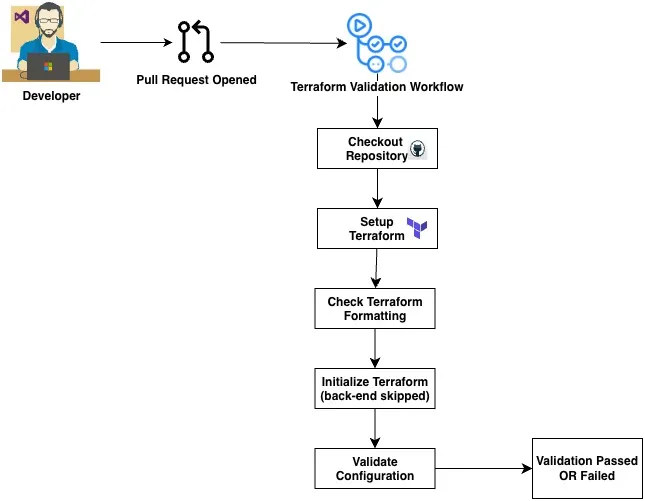
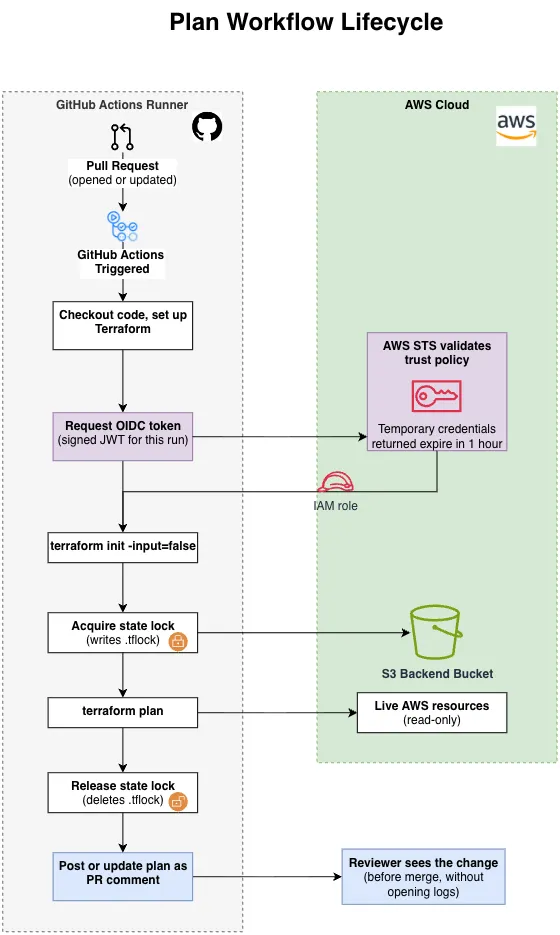
For example, I would configure Amazon Route 53 with a custom domain and use AWS Certificate Manager (ACM) to enable HTTPS over a branded domain. I would also automate deployments using GitHub Actions, allowing infrastructure changes and website updates to be deployed through a CI/CD pipeline rather than manual commands.
From an operational perspective, I would incorporate CloudWatch for monitoring and alerting, along with CloudFront cache invalidation as part of the deployment workflow to ensure users receive updated content immediately after new releases.
These enhancements weren’t necessary to achieve the objectives of this project, but understanding where they fit into the overall architecture is an important part of designing cloud solutions that hold up in production.
Conclusion
The decisions that mattered here were mostly about what not to build. Every page was generated at build time, so there was no compute to provision. CloudFront needed a private origin, so S3 Static Website Hosting came out of the design entirely. Neither was obvious to me at the start, and both came from reading the workload before reading the service list.
What I would change with more time: the backend bootstrap is still a manual step outside Terraform’s control, and deploying still means running two commands in the right order by hand. Both are fine until someone else touches the repository.
If you would like to explore the complete implementation, including the Terraform configuration and project structure, view the complete project on GitHub.