Hello Nic and welcome to Advanced Installer forums,
First of all, please accept my apologies for the delayed reply.
One thing to keep in mind is that Windows Installer does not allow two installation processes to take place at the same time.
This is exactly why your script is not executing.
Basically, the installation process (your main process) will try and wait for the custom action to finish before proceeding. By doing this, the second process will not even be launched because the first one did not end yet (because the
"Wait for custom action to finish before proceeding" option is checked in the
"Custom Actions" page --> your custom action -->
"Execution Options" section)
If you want to check this first hand, you can modify your script as it follows:
- after "Param()", add the following line:
Code: Select all
Add-Type -AssemblyName PresentationFramework
(this will allow us to use the MessageBox class)
beside that, after calling the Uninstall() method ("$app.Uninstall()"), add the following lines:
Code: Select all
$var = $app.Uninstall.returnvalue
[System.Windows.MessageBox]::Show($var)
By doing so, you will notice that the returned code will be "1618". By doing a little research, we can find out that this code means:
ERROR_INSTALL_ALREADY_RUNNING
Another installation is already in progress. Complete that installation before proceeding with this install.For information about the mutex, see _MSIExecute Mutex.
As discussed above, in order for this to work, we have to force the main process (the main installation process) to not wait for the CA. This can be done by disabling the following "Execution Options":
- Wait for custom action to finish before proceeding
and
- Fail installation if custom action returns an error
However, by placing the PowerShell Custom Action after the "Finish Execution" action group, you will notice that the
"Wait for custom action to finish before proceeding" is disabled (the checkbox state cannot be altered).
The reason behind this can be found in the following Microsoft article:
Custom Action Return Processing Options
As can be seen in the above article:
An asynchronous execution that waits for exit code at the end of the sequence.
This option cannot be used with Concurrent Installations, Rollback Custom Actions, or Script Custom Actions.
"This option cannot be used with bla,bla,bla or Script Custom Actions"
This means that what you want to achieve is not possible with a script-based custom action.
However, this can still be achievable.
Basically, what we will need here is a .BAT file that will launch PowerShell and then run our script.
Important: One very important thing here is the fact that we need to launch the 64-bit PowerShell, otherwise the condition that is based on the registries will fail (due to registry redirection).
Here is how the .BAT file can look like:
Code: Select all
"C:\Windows\System32\WindowsPowerShell\v1.0\powershell.exe" -ExecutionPolicy Bypass -File "C:\Users\Catalin\Desktop\sample.ps1"
where
sample.ps1 is the script that does the uninstall. Its content (for my tests) is:
Code: Select all
$software = "Java 8 Update 191 (64-bit)"

$installed = (Get-ItemProperty HKLM:\SOFTWARE\Microsoft\Windows\CurrentVersion\Uninstall\* | Where { $_.DisplayName -like $software }) -ne $null

if($installed){
$app = Get-WmiObject -Class Win32_Product | Where-Object {
$_.Name -like $software
}
$app.Uninstall()
}
Basically, here, you will just need to replace the "$software" variable to match your needs.
Now, in order to integrate this in Advanced Installer, you can proceed as it follows:
- add the .BAT file to your project (in the
"Files and Folders" page)
- go to
"Custom Actions" page
- add a
"LaunchFile" custom action with sequence (by pressing the
"Add custom action with sequence" button which is placed to the right side of the CA name)
- schedule it after the
"Finish Execution" action group ("Install Execution Stage").
- the CA should look like this:
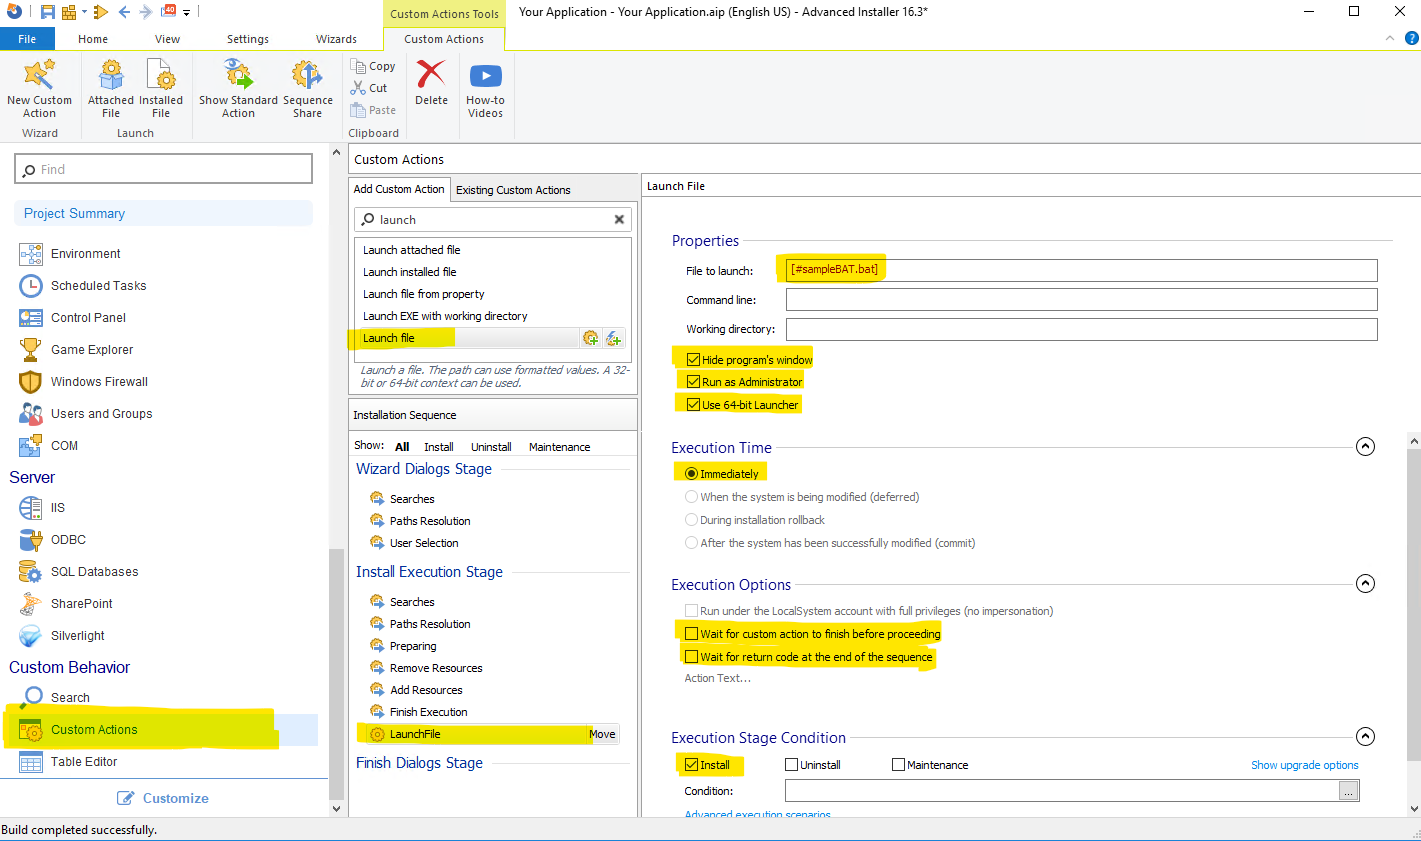
- Annotation 2019-09-25 183035.png (159.02 KiB) Viewed 4222 times
Simply replace the .BAT file name with the name you wish.
This way, your software should be correctly uninstalled.
Hope this helps.
Best regards,
Catalin


FOLLOW US
Get the latest news in Application Packaging