

Cloud Firestore is a NoSQL cloud database that stores application data in collections and documents. It provides real-time data synchronization, flexible data modeling, and integration with applications through the Firebase platform.
- Stores data in collections and documents.
- Supports real-time updates and offline data access.
- Provides security rules for controlling access to data.
- Can be integrated with web, mobile, and backend applications.
Data Model
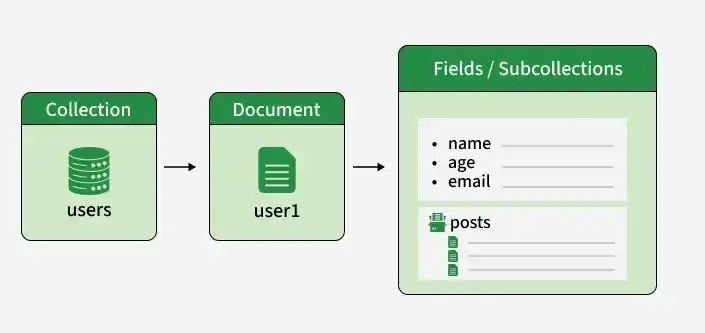
- Firestore uses a document-based data model instead of traditional rows and tables.
- Data is organized into collections and documents.
- A collection contains multiple documents.
- A document stores data as key-value fields.
- Documents can contain nested objects, arrays, and subcollections.
Working
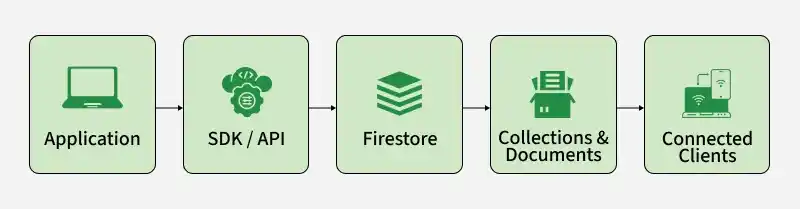
- Applications connect to Firestore using Firebase SDKs, Google Cloud SDKs, or APIs.
- Data is stored as documents inside collections.
- Applications can perform Create, Read, Update, and Delete (CRUD) operations.
- Firestore synchronizes supported data changes with connected clients.
- Security Rules control access to Firestore data.
Cloud Firestore in Google Cloud
- Cloud Firestore is a Google Cloud database service that is also closely integrated with Firebase.
- Firebase provides SDKs and tools for using Firestore in mobile and web applications.
- Firestore can work with services such as Cloud Functions, Cloud Run, Cloud Storage, and IAM.
- It allows developers to combine Firebase development tools with Google Cloud infrastructure.
Setting Up Cloud Firestore in Your Project
Step 1: Create a Google Cloud Project
- Open the Google Cloud Console:
https://console.cloud.google.com/- Sign in with your Google account.
- Click Select a project from the top navigation bar.
- Click New Project.
- Enter the following project name:
firestore-gfg-demo- Click Create.
- After the project is created, select:
firestore-gfg-demoStep 2: Open Firebase Console
- Open the Firebase Console:
https://console.firebase.google.com/- Sign in using the same Google account.
- Click Add project.
- Instead of creating a new Google Cloud project, select the option to Add Firebase to an existing Google Cloud project.
- Select:
firestore-gfg-demo- Click Add Firebase or Continue.
- Wait for Firebase to finish setting up the project.
Step 3: Open the Firebase Project
- After the setup is complete, open the Firebase project:
firestore-gfg-demo- You should now see the Firebase project dashboard.
Step 4: Create a Cloud Firestore Database
- From the Firebase Console, open:
- Build → Firestore Database
- Click Create database.
- Select a database location.
- For a demonstration, you can use an available location close to your users.
- Click Next.
Step 5: Configure Firestore Security Rules
- Select the appropriate security rules option shown by Firebase.
- For a learning demonstration, you can use Test mode if Firebase offers it.
- Click Create.
Note: Test mode is intended for development and learning. Do not use insecure Firestore rules in a production application.
- Wait for the database to finish provisioning.
Step 6: Register a Web App
- From the Firebase project overview, click the Web (
</>) icon. - Enter an app nickname:
firestore-web-demo- Click Register app.
- Firebase will display a configuration object containing values such as:
const firebaseConfig = {apiKey: "YOUR_API_KEY",authDomain: "YOUR_PROJECT_ID.firebaseapp.com",projectId: "YOUR_PROJECT_ID",storageBucket: "YOUR_STORAGE_BUCKET",messagingSenderId: "YOUR_MESSAGING_SENDER_ID",appId: "YOUR_APP_ID"};
- Keep this configuration available because we will use it in the JavaScript application.
Step 7: Create the Local Project
- Open Terminal on your Mac.
- Create a project directory:
mkdir firestore-js-project- Move into the directory:
cd firestore-js-project- Create the required files:
touch index.html app.js firebase-config.js- Check the files:
ls- You should see:
app.jsfirebase-config.jsindex.html
Step 8: Configure Firebase
- Open the Firebase configuration file:
nano firebase-config.js- Paste the Firebase configuration provided by the Firebase Console:
export const firebaseConfig = {apiKey: "YOUR_API_KEY",authDomain: "YOUR_AUTH_DOMAIN",projectId: "YOUR_PROJECT_ID",storageBucket: "YOUR_STORAGE_BUCKET",messagingSenderId: "YOUR_MESSAGING_SENDER_ID",appId: "YOUR_APP_ID"};
- Replace the placeholder values with the values from your Firebase project.
- Save the file.
Step 9: Create the HTML Page
- Open the HTML file:
nano index.html- Add:
<!DOCTYPE html>
<html lang="en">
<head>
    <meta charset="UTF-8">
    <meta name="viewport" content="width=device-width, initial-scale=1.0">
    <title>Cloud Firestore Project</title>
</head>
<body>

    <h1>Cloud Firestore with JavaScript</h1>

    <h2>Add Data</h2>

    <input type="text" id="name" placeholder="Name">
    <input type="number" id="age" placeholder="Age">

    <button onclick="addData()">Add Data</button>

    <h2>Read Data</h2>

    <button onclick="getData()">Get Data</button>

    <ul id="data-list"></ul>

    <script type="module" src="app.js"></script>

</body>
</html>
- Save the file.
Step 10: Add Firestore JavaScript Code
- Open the JavaScript file:
nano app.js- Add:
import { initializeApp } from "https://www.gstatic.com/firebasejs/12.3.0/firebase-app.js";

import {
    getFirestore,
    collection,
    addDoc,
    getDocs
} from "https://www.gstatic.com/firebasejs/12.3.0/firebase-firestore.js";

import { firebaseConfig } from "./firebase-config.js";

const app = initializeApp(firebaseConfig);

const db = getFirestore(app);

window.addData = async function () {

    const name = document.getElementById("name").value;
    const age = document.getElementById("age").value;

    try {

        const docRef = await addDoc(collection(db, "users"), {
            name: name,
            age: parseInt(age)
        });

        console.log("Document written with ID:", docRef.id);

    } catch (error) {

        console.error("Error adding document:", error);

    }
};

window.getData = async function () {

    try {

        const querySnapshot = await getDocs(collection(db, "users"));

        const dataList = document.getElementById("data-list");

        dataList.innerHTML = "";

        querySnapshot.forEach((doc) => {

            const data = doc.data();

            const listItem = document.createElement("li");

            listItem.textContent = `${data.name}, ${data.age}`;

            dataList.appendChild(listItem);

        });

    } catch (error) {

        console.error("Error reading documents:", error);

    }
};
- Save the file.
Step 11: Start a Local Web Server
- From the project directory, run:
npx serve .- The terminal will display a local URL, usually similar to:
http://localhost:3000- Open that URL in your browser.
Step 12: Add Data to Firestore
- On the webpage, enter:
Name: John DoeAge: 30
- Click Add Data.
- Open the browser developer console and check for a message similar to:
Document written with ID: ABC123Step 13: Verify the Data in Firestore
- Open the Firebase Console.
- Go to: Build → Firestore Database → Data
- You should see a collection named:
users- Inside the collection, you should see a document containing:
name: John Doeage: 30
Step 14: Add Another Document
- Return to the web application.
- Enter:
Name: Jane SmithAge: 25
- Click Add Data.
- The
userscollection should now contain two documents.
Step 15: Read Data from Firestore
- Click the Get Data button on the webpage.
- The documents from the
userscollection will be retrieved and displayed on the page.
Example:
John Doe, 30Jane Smith, 25
Advantages
- Handles increasing application traffic and data.
- Synchronizes data changes across connected clients.
- Supports structured and nested data.
- Allows applications to work with cached data.
- Works with Firebase and Google Cloud services.
- Eliminates the need to manage database servers.
Limitations
- Costs can increase with a high number of reads, writes, and deletes.
- Complex queries may require additional indexes.
- It is not designed for traditional relational database workloads.
- Highly relational applications may require a different database solution.
- Firestore has limits on document size, queries, and certain database operations.