


Custom Actions Page
Add custom actions to the installation process.
 The information presented in this article can be applied in a similar fashion to
Custom Actions Page from Merge Module
Project.
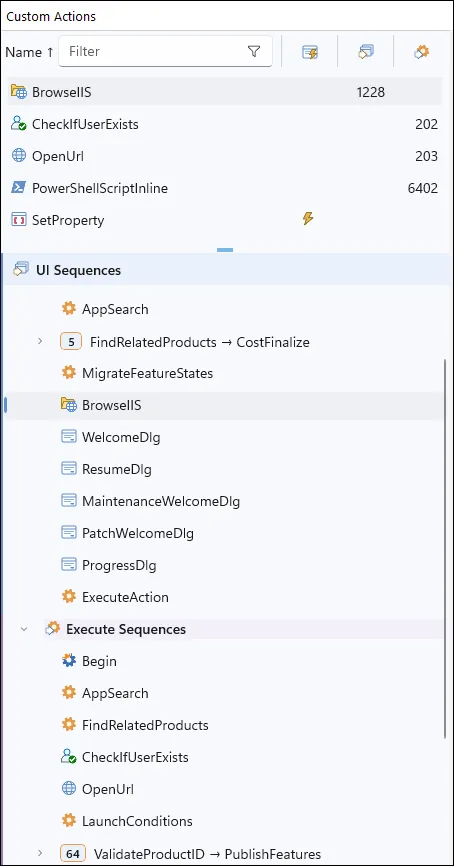

Existing Custom Actions
The top pane contains all the custom actions configured in your project, including unsequenced actions. Use the Filter field to narrow down the list, and select an action to edit its properties in the right-side pane.
Installation Stages
In the "Installation Sequence" pane are the installation stages. Each stage contains several standard actions and user defined custom actions.
UI Sequence
Contains the actions that are executed when displaying the user interface (if the user interface is set to full). The actions in this sequence are executed only if you haven't selected the basic type of interface (in the Install Parameters).
The action groups from this stage are:
- Begin - the initial UI stage containing Prepare Dialog.
- Searches - Searches from the Search Page are performed.
- Paths Resolution - Directories paths, Features and Components states are resolved. Amount of required space is computed.
- User Selection - The installer dialogs interaction before pressing the button.
Execute Sequence
Corresponds to the sequence that follows the button's pressing.
The action groups from this stage are:
- Begin - The initial Execution stage.
- Searches - Searches from the Search Page are performed.
- Paths Resolution - Directories paths, Features and Components states are resolved. Amount of required space is computed.
- Preparing - Verifies all volumes for sufficient space for the installation. Checks and notifies the user if any installation files are in use. You can set the deferred, rollback or commit flag for actions after this group. These are executed by Finish Execution action group. You can run them elevated by using the "with no impersonation" flags.
- Remove Resources - All resources are removed from the target machine.
- Add Resources - All resources are installed on the target machine.
- Finish Execution - Executes all deferred, rollback, commit actions.
Finish Dialogs Stage
Actions from this stage are executed last in the installation after the Install Execution Stage once the progress is complete.
 For more related information you can follow Windows Installer Custom Actions.
Operations
Organizing Custom Actions - Sequenced actions are scheduled in the order shown in the installation sequence. To move a custom action, drag it to a valid insertion point or use “Move After” from its context menu to choose an action in the UI or Execute sequence. The drag-and-drop indicator shows the insertion point; invalid locations are rejected according to the custom action's scheduling requirements.
Sharing Custom Actions - To schedule a custom action in both the UI and Execute sequences, use “Share After” from its context menu, or hold Shift while dragging it to the other sequence. Sharing is available only when the action supports the target location and is not already scheduled in that sequence. An action scheduled only in the UI sequence does not run during a silent installation; schedule it in the Execute sequence if it must also run silently.
Renaming Custom Actions - You can rename a custom action by selecting the “Rename” context menu option or by pressing the F2 key, while the action is selected. Names must be valid Windows Installer identifiers and must not duplicate an existing name. When renaming an action in the installation sequence, the AI_ prefix is reserved for Advanced Installer.
 Standard Actions cannot be moved using drag-and-drop
or the move commands on this page.
Add Custom Actions
Click on the toolbar, choose “New” from the context menu, or press Insert while the custom actions list or installation sequence is focused to open the new custom action popup.
Filter the available custom actions using keywords, then select an action to see its description and placement options. While the popup's filter field is focused, use the Up and Down arrow keys to select a result without leaving the field.
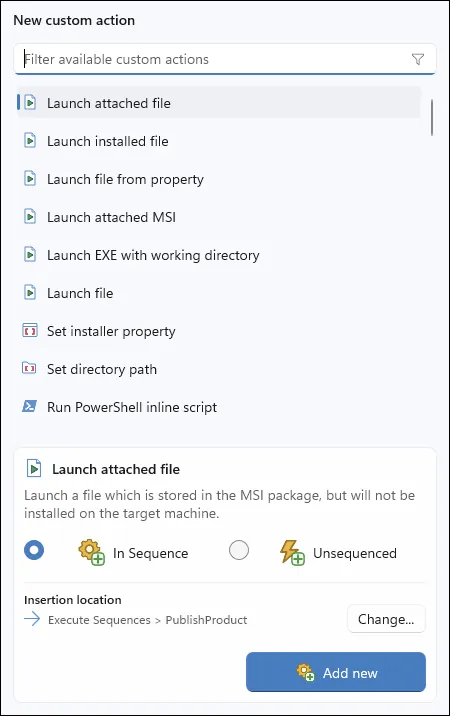

Choose How the Action Runs
Select one of the following modes, then click . A mode is disabled when it is not supported by the selected custom action.
 In Sequence - Schedule the action in the installation sequence. Review
the Insertion location before adding it. When you select an action in
the sequence before opening the popup, the new action is inserted after that action,
provided the location is valid. Opening the popup from a group's context menu inserts
the action at the beginning of that group. Otherwise, an appropriate default location
is used.
Click to choose a different location in “UI Sequences” or “Execute Sequences”, or select “Use default location” to restore the selected action type's default placement. If the requested location is not valid for that action, Advanced Installer uses a valid default when available. Hover over the information icon next to Insertion location to see why the location was adjusted. If no valid insertion point is available, is disabled until you choose a valid location.
 Unsequenced - Create an action without scheduling it in the installation
sequence. To run it from a dialog, configure an
Execute custom action control event
on the Dialogs page. Adding an unsequenced action does not make it run automatically.
After adding the action, configure its properties in the right-side pane. You can
change a sequenced action's location later using drag-and-drop or “Move After”.
Set Custom Action Properties
Select an action in the existing custom actions list or installation sequence to edit its Custom Action Properties in the right-side pane.
Toolbar Operations
 Creating a new custom action using a wizard - Use the toolbar button, to quickly and easily create a new custom action, following
step-by-step directions.
 Adding a custom action to be run from a file attached to the installation - Use
the toolbar button, or select the corresponding action
in the new custom action popup and click . An "Open File" dialog
lets you choose the custom action file from your disk.
 Adding a custom action to be run from an installed file - Use the toolbar button, or select the corresponding action in the new
custom action popup and click . The
File Picker Dialog dialog lets you select a file from your project.
 Removing a custom action - Use the toolbar button, the
“Delete” context menu item or press the Delete key while the
“Install Sequence” panel is focused.
 Switch to Compact view - Reduce item spacing and text size to fit more actions
on screen. This display option is independent of the tree layout.
 Sequence Numbers - enable this option to show the sequence
number of the custom actions of the project.
Tree Layout - Choose how the installation sequence is displayed:
- Groups - Organize actions into expandable groups by installation stage.
- Sequences - Show every action individually in sequence order, without grouping.
- Condensed - Combine consecutive actions into expandable groups while keeping custom actions and their surrounding steps visible.
Changing the tree layout does not change the actions' execution order.
Custom Action Return Code
A custom action's return code depends on the type of source file. Therefore, the return code of a function called from a VBScript is not the same as the one returned by an .exe or .dll file.
For more information regarding custom action return codes please see: Custom Action Return Values.
For more information regarding JScript or VBScript return codes please see: Return Values of JScript and VBScript Custom Actions.
Topics
- Custom Action Properties
Setting a Custom Action's properties in Advanced Installer. - Custom Actions List
Description of all predefined custom actions available in Advanced Installer.